Journal of Machine Intelligence and Data Science (JMIDS)

Volume 4 - Year 2023 - Pages 15-26
DOI: 10.11159/jmids.2023.003
Mobile Application for Skin Cancer Classification Using Deep Learning
Iren Valova1, Peter Dinh2 ,Natacha Gueorguieva3
1Department of Computer and Information Science, University of Massachusetts Dartmouth
285 Old Westport Rd., Dartmouth, MA, USA
Iren.Valova@umassd.edu
2Computer Systems Technology Department, New York College of Technology/City University of New York
300 Jay Street, Brooklyn, NY, USA
Peter.Dinh20@citytech.cuny.edu
3Department of Computer Science, College of Staten Island/City University of New York
2800 Victory Blvd, NY, USA
Natacha.Gueorguieva@csi.cuny.edu
Abstract - Malignant melanoma is the deadliest skin cancer and early detection is important to improve patient prognosis. Recently, deep learning neural networks (DLNNs) have proven to be a powerful tool in classifying medical images for detecting various diseases and it has become viable to address skin cancer detection. In this research we propose a serverless mobile app to assist with skin cancer detection. This mobile app is based on the best performance of five convolutional neural network (CNN) models designed from scratch as well as four state-of-the-art architectures used for transfer learning (Inception v3, ResNet50v2, DenseNet, and Exception v2). Since the skin cancer dataset is imbalanced, we perform data augmentation. We also use the fine-tuning top layers technique for feature extraction on all models to improve the results. The main novelty of the proposed method is deploying the model as part of mobile app where the classification processes are executed locally on the mobile device. This approach reduces the latency and improves the privacy of the end users compared with the cloud-based model where user needs to send images to a third-party cloud service. The achieved accuracy of pre-trained Inception v3 model is 99.99%. Therefore, the proposed mobile solution can serve as a reliable tool that can be used for melanoma detection by dermatologists and individual users.
Keywords: Melanoma, Deep learning, Transfer learning, mobile app, Convolutional neural networks.
© Copyright 2023 Authors - This is an Open Access article published under the Creative Commons Attribution License terms. Unrestricted use, distribution, and reproduction in any medium are permitted, provided the original work is properly cited.
Date Received:2023-08-17
Date Revised: 2023-09-21
Date Accepted: 2023-09-26
Date Published: 2023-10-10
1. Introduction
Skin cancer is the most common type of cancer in the US. Statistically, 1 out of 5 people will get skin cancer at some point in their life [1]. The vast majority of skin cancer deaths are due to malignant melanoma. Most skin cancers either spread to other parts of the body and/or are fatal unless detected and treated early. In its initial stages, malignant melanoma is completely curable with a simple biopsy [2]. Therefore, an early detection is the best solution to improve skin cancer prognosis. However, if the diagnosis and treatment begin in late stages, it usually takes long time to achieve positive outcome. Unfortunately, many people put off a visit to a doctor during the early stages when the problem can be easily isolated and cured. Thus, there is a need for a mHealth app – a self-examination tool for individual user with a standard camera from the smartphones through installation of an app on mobile device that can perform a quick, efficient, and low-cost diagnosis.
Convolutional neural networks (CNN) have been applied to many fields such as image recognition and object detection as well as other research domains. Computer-aided systems for skin lesion diagnosis present a growing area of research. Recently, researchers have shown an increasing interest in developing computer-aided diagnosis systems. There are several methods of deep learning but the pre-trained deep learning models and handcrafted methods that are based on a deep learning approach already show promising results with high-precision accuracy for melanoma detection [3].
Mobile health defined as the use of mobile devices with machine learning, is a rapidly growing field in the digital health sector providing healthcare support and intervention. It has the potential to reduce the cost of health care and to improve the well-being in numerous ways [4]. Machine learning requires a large amount of storage and system processing which is a challenging for mobile applications. Many mHealth applications deploy machine learning model on a cloud-based server but this approach has some disadvantages such as the time it takes for a cloud-based server to respond to a client request and the privacy issues which might arise when sending sensitive medical data. Researchers in [5] present the concept of a system that consists of a smartphone application available to the client (client side) and the server side of the system, consisting of a general-purpose server, computing server, users database, and images database.
In this research we propose a novel on-device inference app to assist with skin cancer detection. The app uses on-device pre-trained classification model to perform classification of new data. The classification process utilizes a pre-trained CNN model with 25,331 dermoscopic images generated by the International Skin Imaging Collaboration [6]. As the dataset is small and imbalanced we implement data augmentation to avoid overfitting.
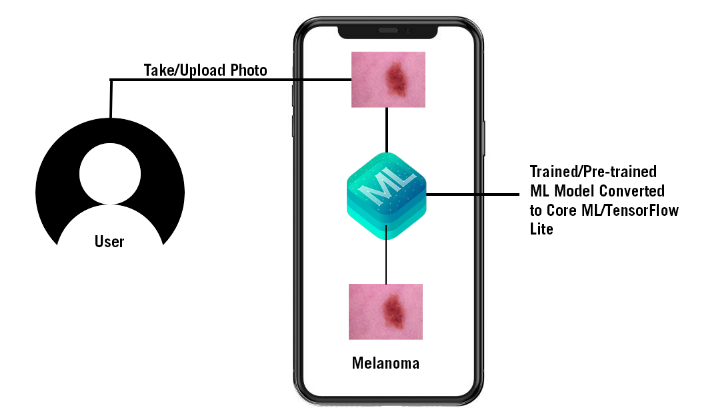
Our proposed model is deployed on mobile app, where the inference process takes place. When presented with new image all computations are executed locally where the test images remain. This approach reduces the latency and improves the privacy of the end users compared with the cloud-based model where the user needs to send images to a third-party cloud service. Figure 1 demonstrates the on-device inference for Skin Cancer Detection app process.
In Section 2 of this paper we discuss some recent CNN based architectures emphasizing on two special features namely local connectivity and shared weights which make this type of topologies exceptionally convenient for processing color images. We also discuss the transfer learning implementation for feature-extraction and fine-tuning, implemented software as well as specificity of on-device machine learning. In Section 3 of this research we describe the details of the dataset used in our experiments, additional modifications of neural network topologies as number of layers and neurons, batch size, optimization, fine-tuning adjustment of parameters to improve the NNs performance. An important issue is the choice of appropriate file format and its integration into iOS app where the training, fine-tuning and making predictions takes place. In Section 4 we discuss the details of five CNN architectures used in our experiments and performance metrics. The latter includes evaluation report as well as tables and graphics of training and validation accuracy and loss. In Section 5 we describe the model conversion and its integration into Core ML and TensorFlow Lite model in order to build an iOS and an Android app. In Section 6 we explain the process of using on-device inference approach and Xcode Integrated Development Environment (IDE) created by Apple Inc. for building software application projected for iOS devices. Section 7 concludes the research presented in this paper and outlines the future work.
2. Application Design and Methodology
We design an on-device machine learning mobile app to support the diagnosis of skin cancer using a CNN topology selected from the following five advanced architectures: Inception v3, ResNet50v2, DenseNet, and Exception v2. The above models represent pre-trained networks for object classification and detection over a large dataset. Training the models is done on the basis of Transfer Learning using a dataset of 25,331 dermoscopic images generated by the International Skin Imaging Collaboration [6]. We convert the best performance model to Core ML and TensorFlow Lite model and import it to the iOS and Android app using Xcode, Android Studio Integrated Development Environment. This methodology has many benefits namely the computations are performed on the device, the data process is handled on the user’s device, and the app does not rely on network connectivity to function.
2.1. Convolutional Neural Networks (CNNs)
The convolutional neural networks are a special type of deep learning network (DNN). The architecture of CNN is different from other deep learning models. There are two special aspects of the CNN architecture, i.e., local connections and shared weights. CNN exploits the local correlation using local connectivity between the neurons of near layers and use a special architecture which is well-adapted to classify images. This architecture makes convolution multi-layer networks fast to train and at the same time exceptionally effective for image classification [7].
When CNN processes an image, it utilizes convolutional operations to extract useful information from its pixels. The input image, when passed through a convolutional layer, produces set of output images, known as output feature maps. The output feature maps detect features such as edges and color composition variation. The next layer detects slightly more complicated features, such as shapes and other geometric structures. The more layers the network has the more convolution layers learn to detect more complicated features. The final layers of the CNNs detect specific objects such as cars, horse, cats. The output layer of the CNNs provides a table of numerical values which denotes the probability that a specific object is discovered in the image.
In this research, the dataset contains skin cancer images divided into eight labelled categories (type of skin lesions) and the CNN learns the features of respective types. The CNN model processes the input with a series of convolution, pooling and sub-sampling layers followed by fully connected layers. The convolution and pooling layers perform feature extraction by capturing typical characteristics of the images. The fully connected layers assign a probability for the input image according to the given features.
2.2. Transfer Learning
Presented CNN methods that use transfer learning and parameters fine-tuning for skin lesion classification are the most common and best-performing approaches [3]. We also adopted a similar approach using transfer learning to train CNN models. Transfer learning is a machine learning (ML) method where a model developed for one task is reused for another model on different task. In recent years, transfer learning has gained popularity for image classification tasks because of reasonable training time and improved baseline and final performance.
In a typical image classification, the neural networks try to determine the edges in the initial level layers, shapes in the middle level layers and all specific features in the final layers. However, in transfer learning, we use the initial and middle level layers and only retrain the final layers [8]. Moreover, we need a lot of data to train the model but most of the time the size of the data is not big enough and it takes more time to train CNNs from scratch. Therefore, it is common to use a pre-trained network on a large dataset and then use it as an initialization or a fixed feature extractor for the tasks of interest [9]. The most common ways to use transfer learning are feature-extraction and fine-tuning. Feature extraction serves the purpose of assembling information into meaningful observations, like identifying and reducing the presence of certain edges, shapes, or color patterns [10]. A well-tuned feature extraction layers can identify and amplify characteristics that are relevant to the problem. The role of feature extraction and feature interpretation are controlled by convolutional and fully-connected layers.
2.3. On-Device Machine Learning
Typically, machine learning models deploy on cloud-based servers. However, on-device machine learning is when the app performs interference with models directly on a mobile device. The ML model processes input data such as images, text, or sound on the mobile device rather than sending those inputs to a server and all computations are executed there.
As mobile devices become more powerful, running machine learning on-device has many benefits as: 1. Low latency: the computations have happened on the device; therefore, there is no round trip to the server and no need to wait for the results to come back from the server to the local device. 2. Privacy: with on-device machine learning, the data process can happen on the user’s device. 3. Works offline: since the machine learning model has been deployed on the mobile device, the app does not rely on network connectivity to function. 4. No cost: the app has been deployed on the mobile device and it does not need to host any additional servers or paying for cloud computers. Therefore, the app will only use the processing power of the device.
There are some limitations of on-device machine learning because mobile devices are more restricted in terms of storage, memory, power consumption, and computing resources [11]. Apple’s Core ML is a framework to help integrate machine learning models into the mobile app. It is not only just a runtime environment but also a file format which is integrated into an iOS app. The app uses Core ML APIs and user data to make predictions and to train or fine-tune the model [12]. The framework supports the classification of images, natural language text for processing, speech for converting audio to text, and identifying sounds on audio. Alternatively, we can use Core ML tools to convert other machine learning models into Core ML format and once the model is deployed on a user’s device, we can use Core ML to retrain or fine-tune it on-device, with that user’s data.
TensorFlow is one of the Google’s deep learning libraries with several components: 1. Tensor is the core framework involving tensor in every computation in TensorFlow. Tensors are n-dimensional matrices respectively vectors. 2. Each value in a tensor shares an identical datatype or shape. 3. TensorFlow uses a graph framework to gather computations done through the training and describe them for all series. The graph can run on multiple GPUs, CPUs, or mobile OS. TensorFlow Lite is a mobile library for deploying models on mobile, microcontrollers and other edge devices [13]. We can train a new model or select a pre-trained model and convert the model to a TensorFlow model with the TensorFlow Lite Converter. The compressed .tflite file can be deployed into a mobile or embedded device [14].
3. Dataset and Image Preprocessing
We built a CNN model from scratch and four transfer learning models based on modification of Inception v3, ResNet50v2, DenseNet, and Exception v2. Since the dataset is imbalanced and small, we apply data augmentation such as random rotation of 180 degrees, random brightness change, and zoom augmentation to create new images from existing ISIC dataset [6]. Moreover, to achieve the best performance of the training model we apply fine-tuning of parameters such as layer freezing, drop learning rate (DLR) on plateau areas (PA). The fully-connected layer is retained in the instantiated pre-trained model.
The dataset entails 25,331 dermoscopic images generated by ISIC [6, 15, 16]. The dataset comprises eight categories of skin lesions: Melanocytic nevi, Melanoma, Basal cell carcinoma, Benign keratosis-like lesions, Actinic keratoses, Squamous cell carcinoma, Dermatofibroma, and Vascular lesions presented in Table 1. All skin cancer images are in 24-bit JPEG format and EXIF tags within the images were removed. Dimensions of these images are inconsistent ranging from 600 × 450 to 1024 × 1024. Figure 2 shows the samples of dermoscopic images.
Table 1. Dataset Skin Lesions Images
|
Skin Lession Type |
Abbreviation |
Total |
|
Melanocytic nevi |
NV |
12875 |
|
Melanoma |
MEL |
4522 |
|
Benign keratosis-like lesions |
BKL |
2624 |
|
Basal cell carcinoma |
BCC |
3323 |
|
Actinic keratoses |
AK |
867 |
|
Squamous cell carcinoma |
SCC |
622 |
|
Dermatofibroma |
DF |
239 |
|
Vascular lesions |
VASC |
253 |

Each skin lesion image has information in the metadata table, which includes all the fields such as lesion identifier, image, age, site, sex, and cell type. The dataset is imbalanced because of unequal distribution of samples. There are 12875 images in Melanocytic nevi. However, there are only 253 images in Vascular lesions.
Image data augmentation is a technique to artificially create new training data from the existing datasets. It transforms the images in the training dataset that belong to the same class as the original one. The transformation includes a range of image manipulation such as shifts, flips, zoom, and others. We applied random rotation of 180 degrees, vertical and horizontal shift, vertical and horizontal flip, random brightness change, and zoom transformations. Furthermore, images were resized to the input size of the model.
Fine-tuning makes small adjustments to the process in order to achieve the desired performance. The basic pipeline involves replacing the last “classifier” layer of a pre-trained network with a new randomly initialized layer for the target task of interest. The modified network is then fine-tuned with additional passes of appropriately tuned gradient descent on the target training set [17]. We use layer freezing technique to fine-tune the training. When a layer is frozen, its weighs are fixed and it cannot be trained. Therefore, it is common to freeze the convolutional layers of the pre-trained model and to train only the custom fully-connected layers. By doing this, the feature-extracting knowledge is learned and kept by storing the weights of the convolutional layers, but the interpretative fully-connected layers are trained to best interpret the extracted features.
We also utilize the important parameter, “include_top” of the Keras pre-trained models to implement the first method of changing pre-trained model architecture for the training. When the parameter “include_top” is set to True, the fully-connected layer will be retained in the instantiated pre-trained model object. Therefore, the parameter, “include_top” is set to True to all models.
The learning rate hyperparameter controls the rate or speed at which the model learns. In this research we reduce the learning rate on plateau areas by a factor for a given number of epochs. The “patience” values, which are the number of epochs to wait before next change of the learning rate is set to 2. In our experiments we use a default learning rate of 0.01 and drop it by setting the “factor” to 0.1 for all models.
4. Model Training and Tools
The core model is implemented on Windows OS using Python, Keras, TensorFlow and several other popular machine learning tools and frameworks to build the mobile app such as Android Studio and Xcode IDE. The specification of the computer on which training and testing take place includes Intel(R) Core (TM) i7-9700F CPU @3.00 GHz, 48 GB installed RAM and NVIDIA GeForce 3060 with 12 GB of memory.
Five state-of-the-art CNN architectures are used for Transfer Learning (Table 2). These models are pre-trained on ImageNet and then fine-tuned on the training set. All models followed the same setup with learning rate of 0.01 excluding the basic CNN model (0.001) for number of epochs - 200. Additionally, all image points outside the boundaries of the inputs are filled from the nearest available pixel of the input. During the training, the two final fully-connected layers of the network are removed, and the new dense layer is added to train the images of all models to fine-tune the model. Also, the class weighted cross-entropy loss is applied during the training to mitigate the data imbalance problem.
The dataset is divided in two parts training and testing by using the “scikit-learn” help function “train_test_split”. The training set consists of 20244 images (80% of the dataset), where the image distribution for different classes is as follows: 9018 Melanocytic nevi, 4014 Melanoma, 3175 Basal cell carcinoma, 2169 Benign keratosis, 829 Vascular lesion, 600 Squamous cell carcinoma, and 212 Vascular lesion. The test set includes 1072 images (the remaining 20% of the base dataset) with the following class distribution: 733 Melanocytic nevi, 126 Benign keratosis, 87 Melanoma, 70 Basal cell carcinoma, 22 Squamous cell carcinoma, 16 Actinic keratosis, 10 Vascular lesion, and 8 Dermatofibroma.
We implement cross-validation technique which not only helps to prevent overfitting by providing a robust estimate of the model’s performance on unseen data but also to compare different models and select the one that demonstrates the highest performance. Figure 3 shows the code for training and testing.

4.1. Metrics
One of the main goals of an automatic skin lesion classification is acquiring specific information and treatment options for a lesion, and achieving this goal depends on correct diagnosis out of multiple categories. We use five different DLNNs (Table 2) for detecting eight categories of skin lesions (Table 1). The purpose of these experiments is to find the best fit for our scenario. The classification reports which give us insight towards precision, recall, and F1 score are the first step of the evaluation process. Component precision measures if the number of “positive” predictions completed by the model are correct, recall calculates how many “positive” class samples present in the dataset are correctly identified by the model, and F1 score – combines precision and recall of a model
4.2 Analysis of Training and Test Results
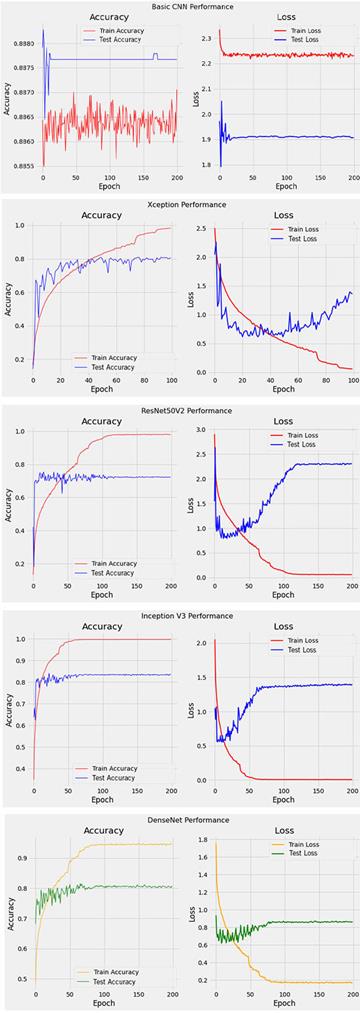
We trained five different neural networks and their difference is the number of frozen top layers for feature extraction. The results summarized in Table 3 show that model Inception v3 has the best performance while both Xception v2 and ResNet50 v2 perform quite similar. The basic CNN model has the lowest performance. Therefore, Inception v3 is chosen as base model for our skin cancer detection algorithm. This model is converted to Core ML and TensorFlow Lite model to deploy in the mobile app.
Plotting of training and testing accuracy, training and testing loss (Figure 4) helps us choosing the best model for our application.
Table 2. Five Convolutional Neural Network Models
|
Model |
Input Size |
Number of Layers |
Number of Parameters |
|
Basic CNN Model |
224 x 224 |
9 |
11,955,369 |
|
Inception v3 |
299 x 299 |
314 |
21,821,225 |
|
Xception v2 |
299 x 299 |
135 |
20,879,921 |
|
DenseNet201 |
224 x 224 |
710 |
20,242,984 |
|
ResNet50 v2 |
224 x 224 |
567 |
58,350,089 |
Table 3. Results of all models with fine-tuning top layers
|
Model |
Training Accuracy |
Training Loss |
Test accuracy |
Test Loss |
|
CNN Model |
88.68% |
1.954 |
88.65% |
2.051 |
|
Inception v3 |
99.99% |
0.0007 |
83.49% |
1.382 |
|
Xception v2 |
99.48% |
0.017 |
80.68% |
1.362 |
|
Dense Net |
98.36% |
0.058 |
80.68% |
0.857 |
|
ResNet50 v2 |
99.72% |
0.017 |
72.23% |
2.311 |
Analysis of Table 3 and Figure 4 shows that Inception V3 model has the highest training accuracy, and its testing accuracy is higher than the testing accuracy of Xception V2, Dense Net and ResNet50 V2 what is additional reason to pick it as our experimental model.
Analysis of classification reports for the participating five topologies shows that Inception V3 model has a precision 100% for detecting a positive vascular lesions (VASC), and its F1 score for identifying Melanocytic nevi (NV) is 0.93. A value for F1 closer to 1 means maximum precision and sensitivity. For the remaining seven categories the precision value of Inception V3 is between 0.70 and 0.91 what is higher or comparable with the performance of chosen topologies.
5. Model Conversion and Intergrading the Pre-trained Model
Inception v3 model is the best model among utilized, with 99.99% accuracy and 0.83 for F1 score. Moreover, it achieves 91% of precision and 95% of recall classifying Melanocytic nevi. Therefore, we use this model and convert it to both Core ML and TensorFlow Lite model in order to build an iOS and an Android app.
5.1. Core ML and TensorFlow Lite Conversions
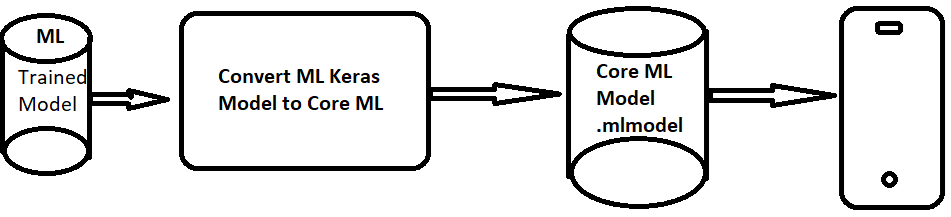
Apple’s Core ML is a framework to help integrate machine learning models into the mobile app. We can integrate the trained ML models into iOS app. Figure 5 shows the process of the conversion. The pre-trained model in Hierarchical Data Formats (HDF5) format will go to a Core ML converter and the output is the Core ML model format (mlmodel).

The TensorFlow Lite converter takes a TensorFlow model and generates a TensorFlow Lite model (an optimized FlatBufffer identified by the “.tflite” file extension) [18]. Figure 6 demonstrates the conversion process of the Keras model to the TensorFlow model.
6. Skin Cancer Detector App on iOS and Android
The model with best performance Inception v3 (Table 3) is then used as a base model. It is further converted to both “mlmodel” and “.tflife” in order to build iOS and Android apps to demonstrate the process of using on-device inference approach. A user can either provide the photo of skin image by selecting existing photo or can take a new photo as an input. The photo classified is based on a probability distribution of the output. It matches with the labels which listed all categories of skin lesions (Table 1) and then displays it on the screen.
6.1. Skin Cancer Detector App on iOS
We build an iOS app which performs the skin cancer detection using a machine learning model that has converted Core ML model to deploy in iOS app. We use the Xcode Integrated Development Environment (IDE) created by Apple Inc. for building software application for iOS devices. Xcode provides developers with a unified workflow for user interface design, coding, testing, and debugging as well as tools for managing project files and resources. We use Xcode to create the app and the interface type of Storyboard. The language for this iOS app is Swift.
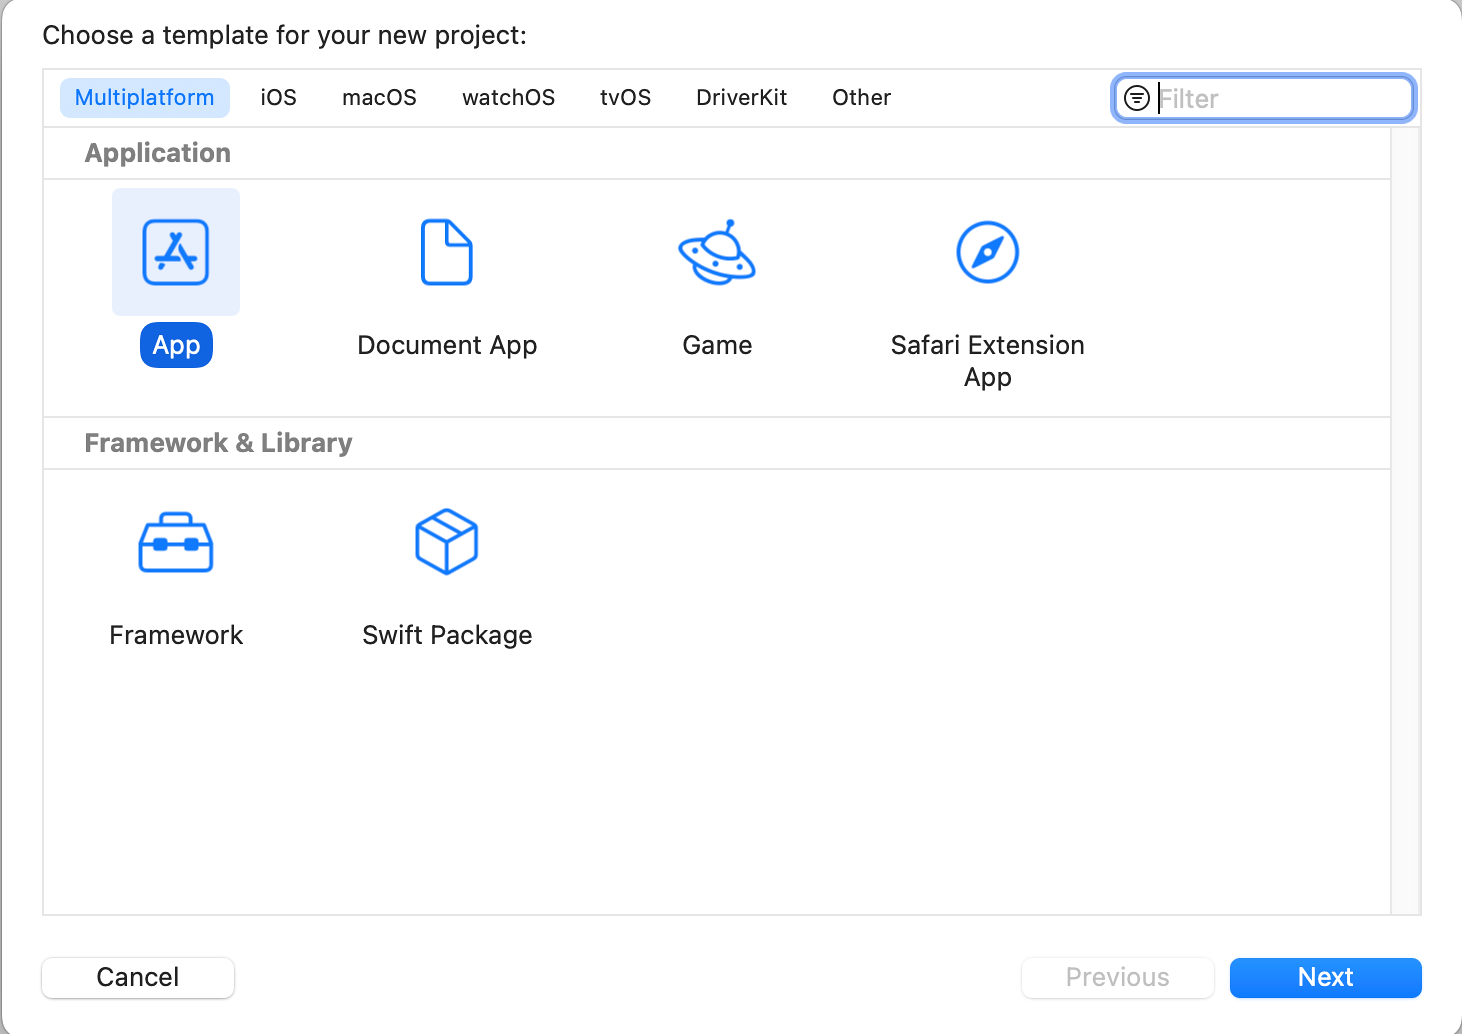
Step1: Choose a template
Open Xcode and create a new project using the “App” template under the iOS category as shown in Figure 7. Choose “Next” to proceed to the next screen to set the name, interface, and language (Figure 8).

Step 2: Design UI of the app
In the Storyboard, we add several “UILabel” for instructions and button. Figure 9 shows a simple Storyboard.

Step 3: Add Model and Image to the app
In the “MainViewControl” (Figure 9), we add the model that has been converted from Keras through Core ML to the app (Figure 10).
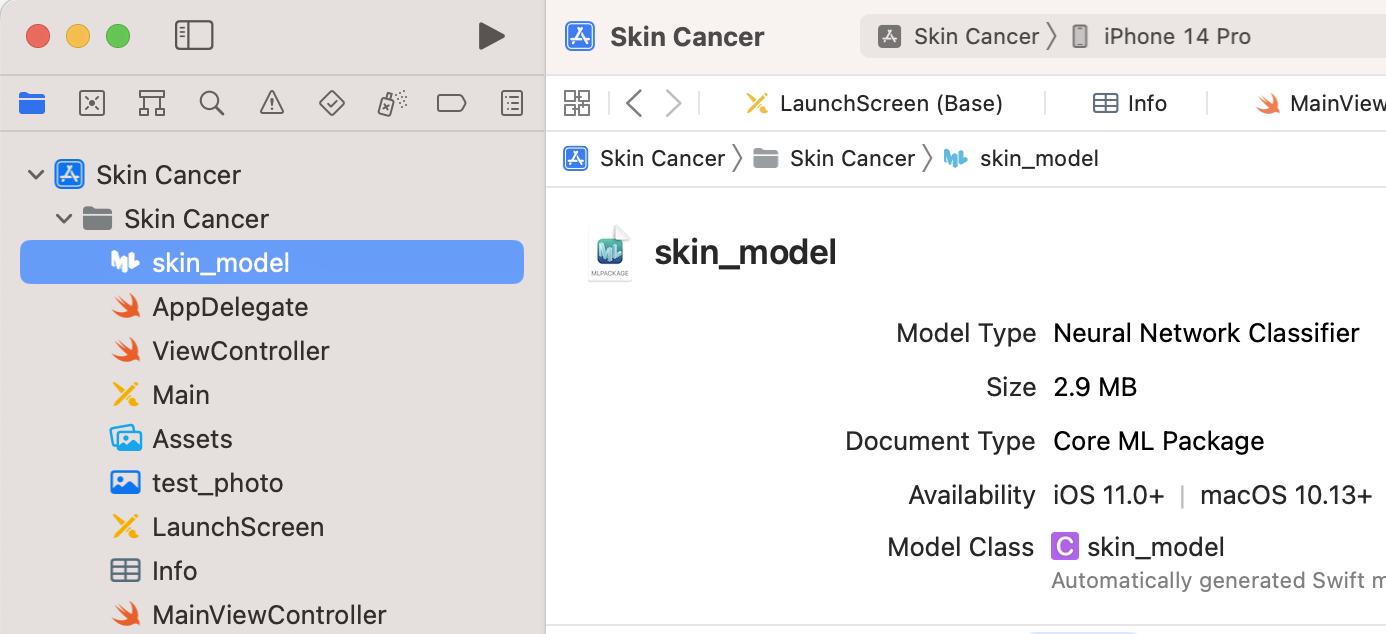
The code in Figure 11 loads the converted Core ML model to the “MainViewControl” of the app.

Step 4: Testing
We test the app using the built-in simulator. In the toolbar, we click on the Run button (Figure 12). Figure 13 shows the demonstration of Skin Cancer Detection on iOS Device. A user can either provide the photo of skin image by selecting existing photo or can take a new photo as an input. The photo classification is based on a probability distribution of the output. It matches with the labels corresponding to all listed categories of skin lesions and then displays the result on the screen.


6.2. Skin Cancer Detector App on Android
Step 1: Create the App with Android Studio
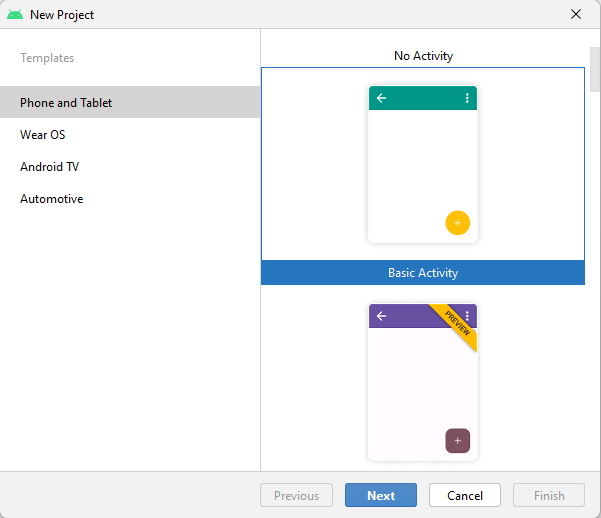
The first step is to create a project template by click on File → New, select “Phone and Tablet,” and select “Basic Activity” template (Figure 14).
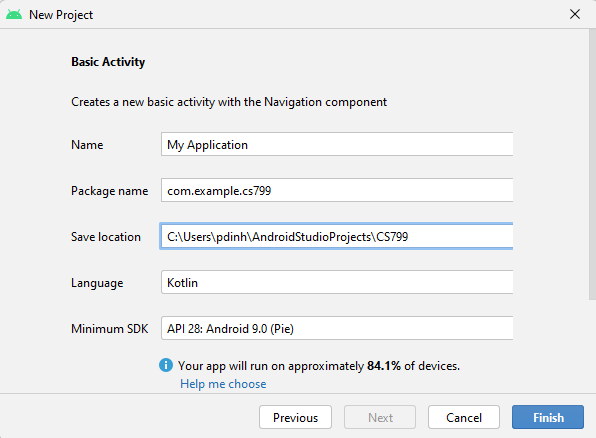
The next dialog asks us for the name, location, and language of the project. Figure 14 shows the information such as name, location, and language of the project that we fill out and click on “Finish” button.
Step 2: Add and Configure Machine Learning Kit
After Step 1, Android Studio IDE will create a boilerplate application with a single empty activity. We use this template to build the Skin Cancer Detector app. The next step is to add external libraries to the project using the “Gradle build tool.” There are two “Gradle” files in the project, one which defines the overall building infrastructure for the project and one for the app. In the IDE, we click on the “build.gradle” file for the Module:app to add the TensorFlow Lite Machine Learning package to the app (Figure 16).

To add the TensorFlow Lite package, we add it in the dependencies section of the “build.gradle” file as shown in Figure 17.
Step 3: Define the User Interface
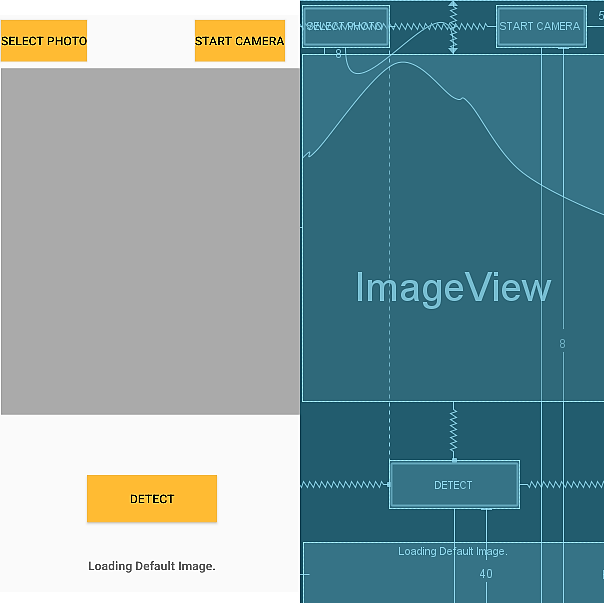
We create a simple user interface (UI) for the app in the following way. In Android Studio, we look for the “res” folder, and within it, we click on the “layout” and “activity_main.xml” as shown in Figure 18. This is an XML file which declares our app interface look like.


Added are two choices “Select Photo” and “Start Camera”. Clicking “Buttons” included in the “Palette” section places the set of buttons on the top of the template (Figure 18). Next, we add the “ImageView” section to load the image and the “Detect” button so when user presses the last button, the Classifier model is called to detect the skin cancer type of the image contained in the “ImageView” section. Then it prints the result in the “Text” box under the “ImageView” section as shown in Figure 19.
Step 4: Add the Image, Labels, and Model as Assets
We create the “assets” folder in the “app/ src/main” folder and add the default image, labels file containing 8 categories, and the model.tflite that we converted from the base model (Inception v3) selected after the training. Figure 20 shows the location of the assets folder containing the image, labels, and the model.
The code in Figure 20 creates a handle to the “ImageView” control and it then gets the file called “skin-icon.jpg” from the variable mSamplePath = “skin-con.jpg” and loads it from the “assets” folder using the helper function as shown in Figure 21.
Step 5: Add the code for the “Detect” button
The code presented in Figure 22 demonstrates the invocation of the classifier model (CM) when the user presses the “Detect” button. The CM will detect the skin cancer type and then return the result of classification.
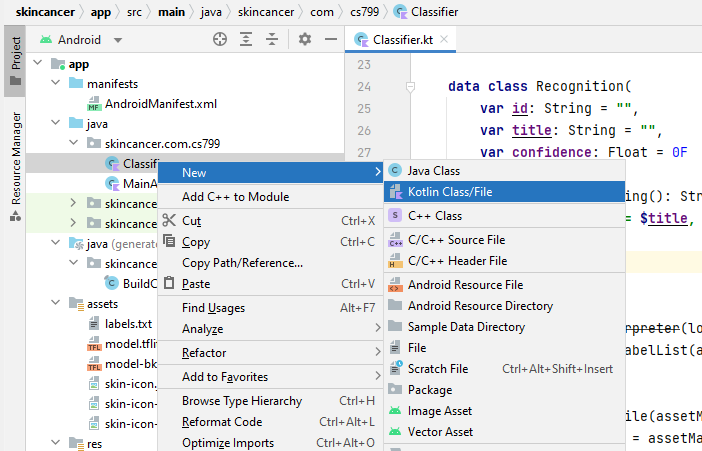
Step 6: Add Skin Cancer Detector Classifier
We add a new file called Classifer.kt by right click on the folder, “skincancer.com.cs799” folder and select New → Kotlin Class/File as shown in Figure 23.


To handle the classification process “Recognition” which returns the classification result we need to implement the sequence of the following functions
- “loadModelFile” to load the converted model;
- “loadLabelList” to list eight classification categories;
- “recognizeImage” to convert the image into Bitmap and detect the image.
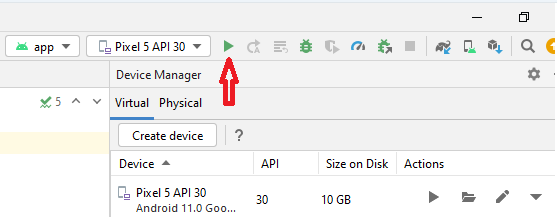
Step 7: Testing
It is necessary to see if the app works with the default image by click on Run on the Virtual Device and click on the Run button or hit the combination keys Shift+F10 as shown in Figure 24.
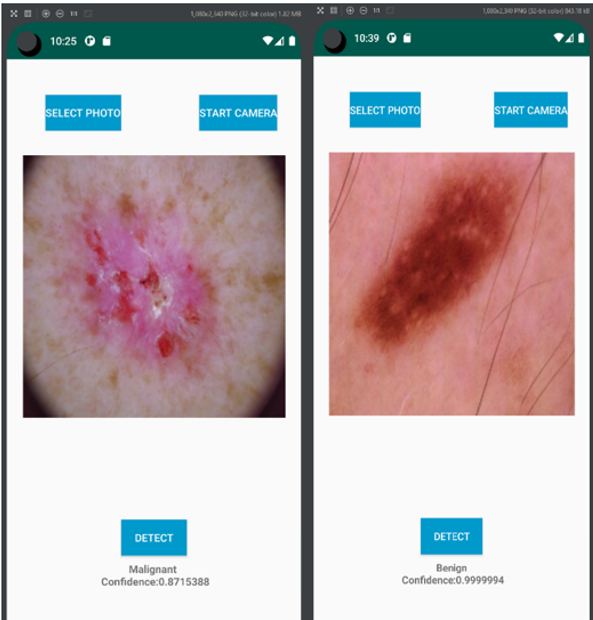
Figure 25 demonstrates the app interface designed for the Android device. A user can either provide the photo of skin image by selecting existing photo or take a new photo as input. The photo classification is based on the probability distribution of the output. It matches with the labels which listed all categories of skin lesions and then displays on the screen.
7. Conclusion
In this research we propose a new skin cancer detector app on iOS and Android to support the diagnostic of skin cancer using CNNs. Building a successful CNN model from scratch requires better architectures and training on large datasets interactively. Instead we implement the transfer learning approach which utilizes the knowledge learned by pre-trained models to design a new model. Since the pre-trained models use large datasets, they already learned the basic features such as corners, edges etc. We use four state-of-the-art architectures for Transfer Learning and evaluate their performance based on accuracy, loss, precision, and recall of the models. The selected Inception v3 architecture defined as a base model has the best performance having 91% precision and 95% when recall classifying Melanocytic nevi.
There are some limitations of on-device machine learning because mobile devices are more restricted in terms of storage, memory and power consumption. Moreover, it is difficult to update the pre-trained model as the model is integrated in the app. Therefore, we plan to perform further testing with PyTorch Mobile framework, an end-to-end workflow from training to deployment for iOS and Android mobile devices in order to further optimize the pre-train models for mobile inference.
References
[1] A. C. Society, "Cancer Facts & Figures 2018," Atlanta, American Cancer Society, 2018.
[2] American Cancer Society: Survival rates for melanoma skin cancer, by stage (2016), View Article
[3] M. Kassem, K. Hosny, R. Damaševičius, M. Eltoukhy , "Machine Learning and Deep Learning Methods for Skin Lesion Classification and Diagnosis: A Systematic Review", Diagnostics (Basel). 2021 Jul 31; 11(8):1390. doi: 10.3390/diagnostics11081390. PMID: 34441324; PMCID: PMC8391467. View Article
[4] Y. Park, "Emerging New Era of Mobile Health Technologies", Healthcare Informatics Research vol. 22,4 (2016): pp. 253-254. doi:10.4258/hir.2016.22.4.253 View Article
[5] G. Ahsan, I. Addo, S. Ahamed, D. Petereit, S. Kanekar, L. Burhansstipanov, L. Krebs, "Toward an mHealth, Intervention for Smoking Cessation", Proc COMPSAC. 2013:10.1109/ COMPSACW. 2013.61. View Article
[6] M. Combalia, C. Noel, C. Codella, V. Rotemberg, B. Helba, V. Vilaplana, O. Reiter, C. Carrera, A. Barreiro, A. Halpern, S. Puig, J. Malvehy, "BCN20000: Dermoscopic Lesions in the Wild", 2019; arXiv: 1908.02288.
[7]L. Deng, Y. Dong, "Deep Learning: Methods and Applications", Foundations and Trends® in Signal Processing: Vol. 7, 2014: No. 3-4, pp 197-387. http://dx.doi.org/10.1561/2000000039 View Article
[8] A. M. Nielsen, "Neural Networks and Deep Learning," Determination Press, 2015.
[9] N. Karthikeyan, "Machine Learning Projects for Mobile Application," Packt, 2018.
[10] K. Weiss, T., Khoshgoftaar, D.Wang, "A Survey of Transfer Learning", Journal of Big Data, 2016. View Article
[11] Y. Andre, "Modern Deep Learning Design and Application Development," Apress, 2022.
[12] On-Device Learning Machine Learning, Google. View Article
[13] Core ML, Integrate Machine Learning Models into Your App. Apple. View Article
[14] Tensorflow. View Article
[15] P. Tschandl, C. Rosendahl, H. Kittler, "The HAM10000 dataset, a large collection of multi-source dermatoscopic images of common pigmented skin lesions", Sci. Data 5, 2018, 180161 doi.10.1038/ sdata.2018.161. View Article
[16] C. Noel, V. Rotemberg, P. Tschandl, M. Celebi, S. Dusza, D. Gutman, B. Helba, A. Kalloo, K. Liopyris, M. Marchetti, H. Kittler, A. Halpern, "Skin Lesion Analysis Toward Melanoma Detection: A Challenge at the 2017", International Symposium on Biomedical Imaging (ISBI), (ISIC)", 2017; arXiv: 1710.05006.
[17] Y. Wang, D. Ramanan, M. Hebert, "Growing a Brain: Fine-Tuning by Increasing Model Capacity", Robotics Institute, Carnegie Mellon University.
[18] TensorFlow Lite Converter. View Article